Help
This page will guide you through the setup and initial configuration of the Server Surveillance Windows Service Monitoring Agent. The Monitoring Agent is required for use with any servers/machines you wish to monitor remotely using your Server Surveillance for Windows Phone 7 app.
The Server Surveillance Configuration Utility is used to configure the types of machine statistics you wish to monitor and be able to view from your Server Surveillance Windows Phone 7 device. This configuration must be performed once for each machine you want to add to an organization and monitor remotely from your phone.
Step 1 – Installing the Windows Service and Configuration Utility:
Download and Install the Server Surveillance Windows Service Monitoring Agent and Configuration Utility on the server/machine you wish to setup monitoring. Once installation completes, the Configuration Utility will automatically start.
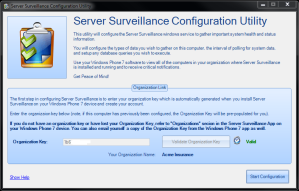
Step 2 – Entering your Organization Key:
Enter the organization key supplied to you by the Server Surveillance for Windows Phone 7 app. If you misplaced your org key, you can obtain it from the Server Surveillance for Windows Phone 7 app from the “Organizations” view of the main screen. Just tap on the organization name and write down or email yourself a copy of the organization key. The organization key is how you “group” servers/machines together in the Windows Phone 7 app.
After entering your organization key, hit the “Validate Organization Key” button. When this succeeds, a green “Valid” notification will appear and you can then click on the “Start Configuration” button.
Step 3 – Configuring Level of Monitoring:
You can now set the level of monitoring you want the Server Surveillance Windows Service Monitoring Agent to analyze on your machine.
The Windows Service monitoring agent does not require you to stop and then restart the service each time you make a change. Any changes you make will automatically be “read” and applied.
Please note that in the screenshot below, the Windows Agent Status reads as “Not Installed”. By default, the Windows Service is not installed when you install the configuration utility. Installation of the Windows Service is the next step.
Step 4 – Install and Start the Windows Service Monitoring Agent:
When you click the “Save Configuration” button or the “Install and Start Service Now” link in the Configuration Utility main screen, you will see some hints on how to setup the service successfully.
The Server Surveillance Windows Service Monitoring Agent runs under the permissions and the account that you enter when it is installed.
For machines that ARE running with on a Domain/Active Directory network:
Type in the machine name backslash account name
Type in the password for the account
An example for the machine in the above screenshot (named JASON7WS, not running on a domain/Active Directory network)
JASON7WS\Jason (where “JASON7WS” is the machine name, “Jason” is the account name I wish the Server Surveillance Windows Service Monitoring Agent to run as)
Password: xxxxxxx
For machines NOT running on a Domain/Active Directory network:
Type in the domain/active directory name backslash account name
Type in the password for the account
An example for the machine in the above screenshot (named JASON7WS, running on a domain/Active Directory network)
MyDomain\Jason (where “MyDomain” is the domain/active directory name, “Jason” is the account name I wish the Server Surveillance Windows Service Monitoring Agent to run as)
Password: xxxxxxx
Confirm your password and hit the “Ok” button.
The Configuration Utility will install and start the Server Surveillance Windows Service Monitoring Agent and start.
When complete, you will see the Agent Status change to green text and read “Running”. The Agent is now actively monitoring your machine and reporting to the Server Surveillance servers for viewing in your Server Surveillance for Windows Phone 7 app!
PLEASE NOTE: The account you choose to install the Server Surveillance Windows Service Monitoring Agent should have Administrator rights to the server/machine on which it is being installed.
Setup Database Queries:
Server Surveillance allows you to setup any number of database queries which can be executed against Microsoft SQL Server 2000, 2005, or 2008 databases. You write the queries (or even execute stored procedures), setup a connection string (so that Server Surveillance knows how to access the database) and set the time interval you want the query or stored procedure to be executed.
The connection string and database query are all stored as encrypted files in the Server Surveillance directory on the server/machine on which it is installed.
The execution of queries are performed on your network (no internet access is made) so you have security, guaranteed. Connection strings and the database queries you setup are NEVER sent to the Internet and remain locally encrypted on your server/machine. Only the results of the queries are sent for remote access from your Server Surveillance for Windows Phone 7 app to access and all transmissions of data to our servers are encrypted and compressed before ever hitting the wire!
To setup a database query, click on the “Add New Query” link of the Server Surveillance Configuration Utility.
Type in the name of the query (this will be what you see in the list of queries on your Server Surveillance for Windows Phone 7 app when you go into the server/machine name on which the query is running).
Click the “Modify/Create Connection String” link. This will display the form that you see in the screenshot below.
Type in the name of the database server running Microsoft SQL Server 2000, 2005, or 2008. We recommend that you use SQL Server Authentication for data query execution and troubleshooting easier for you! But if your database administrator only allows Windows Authentication, then the Windows account that you setup for the Server Surveillance Windows Service Monitoring Agent in Step 4 (above) must have the ability to execute data queries against the target database.
If you choose “SQL Server Authentication”:
1) Enter the user name (do not enter the domain/active directory name in this box) for an account that has the ability to execute data queries against the target database.
2) Enter the password for the SQL Server user account
3) Be sure to check the box “Save My Password” (this saves the password in the connection string that is used by Server Surveillance to access the database — NOTE: the connection string, including the password, is saved as an encrypted file on the machine/server local hard drive. This is NEVER transmitted by Server Surveillance!)
4) SQL Server Authentication account setup is complete. Please continue the next steps.
Choose a database from the list titled “Select or enter a database name” that you want to execute your data query against.
Click the “Test Connection” button. If you receive the message “Test Connection Succeeded”, you’re good to go. If you do not, please repeat the steps above.
Once you receive the message, “Test Connection Succeeded”, click the “Save and Close” button.
Now you can enter the database query you wish to have executed by Server Surveillance and reported for easy access from your Windows Phone 7 device!
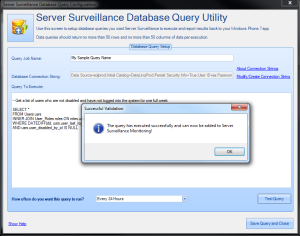
In the screenshot above, I am simply returning a list of users from the database who a) are not disabled and, b) have not logged in more than 7 days. (You can write any query or execute any stored procedure you wish but please note, due to bandwidth limitations and server space considerations by Exceligent Software, we only allow queries to return a maximum of 50 rows and a maximum of 50 columns per execution).
Choose a selection from the drop-down next to the text, “How often do you want this query to run?”.
Click the “Test Query” button to have the utility perform a test execution of your data query using the connection string you built. If the query passes validation, you will see the message in the screenshot above.
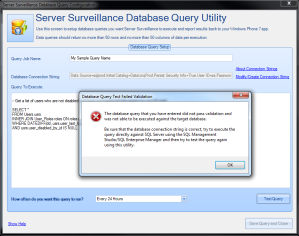
If validation fails, you will see the message as demonstrated below:
Once the query passes validation, the button “Save Query and Close” will be enabled. Click this and you will be returned to the main screen of the Configuration Utility (below).
Be sure the checkbox “Database Query Monitoring Enabled” is checked in the grouping tab titled “Execute Database Queries”. If this checkbox is not checked, the Server Surveillance Windows Service Monitoring Agent will not execute any queries marked in the grid.
If you wish to disable any queries, you can simply uncheck the box in the “Enabled” column of the queries grid. Enabling queries is performing by simply checking the “Enabled” column for the query you wish to enable.
Click “Save Configuration” and the Server Surveillance Windows Service Monitoring Agent will begin executing the queries along with monitoring the vital machine/server statistics you have elected, all according to the schedule you have set.
When you are finished setting up the statistics/data queries you wish to monitor, you may shut down or exit the Server Surveillance Configuration Utility. The Server Surveillance Windows Service Monitoring Agent will continue to run as an installed Windows Service. Restarting your machine/server will automatically restart the monitoring service (not the configuration utility) so you can rest assured no further invention or setup and maintenance is needed on your part!
Now you’re ready to begin monitoring the reports from your server/machine from your Server Surveillance for Windows Phone 7 app!
Keep in mind that it will take about five minutes before the first data report is sent to the Exceligent Software servers for access by your Phone. Statistics are captured in real-time on the server/machine and retained in memory until a set interval has passed. At that time, the statistics (and any results of data queries you have setup per the interval you also set for the queries) will be encrypted, compressed, and sent to our secure servers. Memory statistics are then reset on the server/machine until the next reporting interval has passed. This cycle continues…
Uninstalling Server Surveillance Windows Service Monitoring Agent:
If you need to uninstall the Configuration Utility and Monitoring Agent, simply go into the Control Panel for the server/machine and choose “Add/Remove Programs” or “Programs and Features” (depending on your version of Windows) and find the “Server Surveillance Agent and Configuration Utility” in the list shown. Select this entry and then click “Uninstall” or “Remove”. You will see a notification that “not all software can be removed” but this is erroneous. Since the Windows Service Monitoring agent is not installed as a part of the initial setup of the Configuration Utility program, the Windows installer doesn’t “think” it can uninstall the Windows Service Monitoring Agent. Exceligent Software has coded in a special program into the Installation program for Server Surveillance that will automatically stop the Server Surveillance Windows Service Monitoring Agent and uninstall it when the Configuration Utility is uninstalled via the Control Panel.
Additional Assistance:
We at Exceligent Software are here for you! Send us an email with your problem or question and we’ll be in touch with you fast. In most cases, we respond to support emails within an hour and strive to respond within 15 minutes! We’re able to be reached at support@exceligentsoftware.com.


